Hi there folks!
Here's the first of the last series of updates and blog posts I'll write about Baldomero's Ballad before releasing the game (don't want to spoil the fun by showcasing the entire game secrets before I finish it).
Introduction
When it comes to making games, you can just go grab a simple concept and make it fun and loopy so as to engage the player to keep them, well, playing. Good examples of this approach are roguelites and roguelikes like Binding of Isaac, Enter the Gungeon, Hades, Dead Cells... But the biggest two detractors I find in this genre are repetitive layouts and gameplay focused on luck rather than skill. Mind you, I'm NOT saying these are fully negative points, they work for the genre well since it makes you have that good old "ok one more run".
You also have games that are more focused on making tight and precisely handcrafted levels for the player. You have your metroidvanias (or Exploraction games as I will start calling them from now on, "search action" is too boring sorry), your platformers and many many other genres. Guacamelee STCE, Prince of Persia The Lost Crown, Castlevania, you know the ones by now.
But no matter what type of genre you want to aim your game towards, one thing has to always come to mind if you want your game to stand out: a solid level design! And since today is the last post, I will talk and analyze every single level of the original Castlevania for the NES. Why, you ask? Well, people tend to praise the franchise a lot yet not a lot of folks out there actually talk in depth about one of its most important aspects: the level design. And hey, if people enjoy this enough I'll be glad.
Level 1-1

Level 1, Castlevania, Castlevania Crypt
What we have here is a very solid introduction to the game. A quiet, completely free of enemies area that allows you to get used to the controls. Simon is stiff as a stick, and you better understand how he moves around in the safest way possible. We also find some key elements that will continue throughout the entire game.
Hearts showcase that they don't provide health (we start with full HP, so there's no way the player will make that mistake) but ammo, but the player doesn't have anything that consumes it. And boy, that whip sure is short. If only there was OH HEY, LOOK. An upgrade to the whip! But this just changed the sprite, size feels almost the same. Oh well, the player continues breaking the next fire pot thingy and look again, another whip upgrade! Oh wow, now THIS is what I call useful! The player understands that there are power ups for their main weapon, and the immediate feedback of seeing the whip extend that much will make the player feel untouchable at a reasonable range now.
Now, I'd say that the last candle position is not placed in a very nice place to experiment with. Since it's the closest one to the door, a player might run into the risk of venturing forward to the right, triggering the switch that locks Simon into his walking animation in order to enter the castle. But regardless of that, it gives us the worst of the sub weapons: the knife. The knife was design for you to AVOID IT. It's rate of fire is slower than just using the whip, it deals the lowest amount of damage and it's just there for you to pay attention. Speaking of which...

Level 1, Castlevania, Castlevania Crypt
Foes?! already?! But I just entered the castle! And THIS is the moment in which Castlevania showcases its most important lesson:
Watch, learn, adapt, repeat
We have three ghouls coming towards the player, and the reason is going to tell them to use the whip. And wow, almost obliterated all three of them since they are walking so close to each other, that's great! The player can't stay still though, as they constantly spawn after a few seconds. But ah, here's one thing not a lot of people know about the enemies in the original Castlevania: not all of them do this!
Enemies in this game appear as long as the player resides within a spawning area. Once the player leaves said area, you can take a break and breath for a while. But Castlevania doesn't want you to stop for a long time, and that's what you have the timer constantly ticking on the HUD, telling you to hurry up. Will you ever run out of time on a stage? Highly doubtful considering the length of the levels, but it's another way to add pressure into the player. If we continue, we see our greatest enemy in the entire game: stairs! Now, stairs will be better introduced in future entries, but for now it works fine enough. We can take a higher or lower path, having ghouls on the floor and panthers on the upper story. Don't worry about the panthers though, you'll never see them again after this. And as we continue, we are forced to take the stairs to reach the door. Close to it and spawned from a candle, we have a Rosary, which works as a screen nuke. Useful for sure and present in almost all the Classicvania games, but not really something the player will beg for it as long as they have confidence in their skills.
As you've seen, we have tested the most important lesson multiple times already: the player has witnessed the stairs, learned about how to use the stairs, adapted to its usage and then repeated the action in the end to confirm that the player knows indeed how to operate the most infuriating thing to code on a game ever. FUN!
Level 1-2
Level 1, Castlevania, Castlevania Crypt
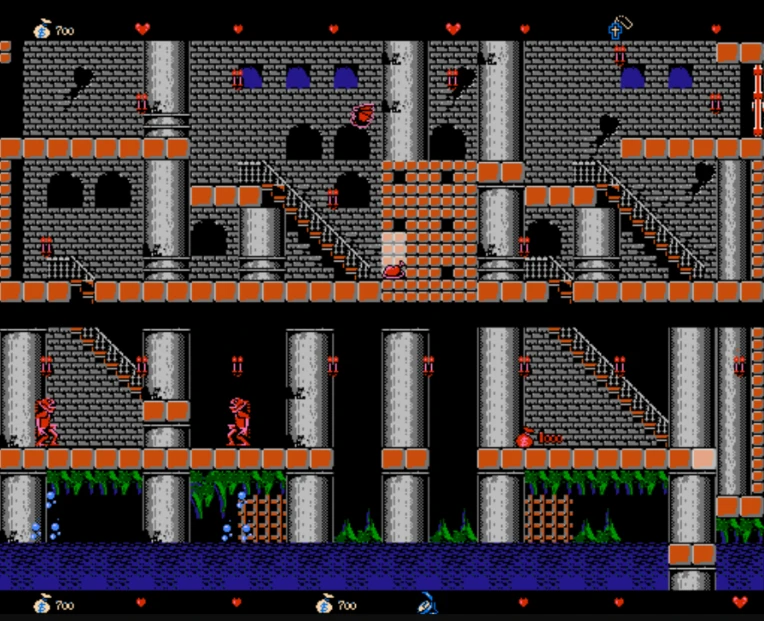
Well cover me in green paint and call me Shrek because this one has layers, just look at this beauty! We are now introducing the player to a lot of things, so I'll go slow with this one. Starting with the obvious: pitfalls.
Up until now our jumping skills have not been tested in a risky situation. Enemies send you backwards once you touch them, so you tend to attack first rather than try to jump them (remember, the ghouls appear in groups of 3, so you can't jump over them. The panther placement is not that well made since it blends with the background but, again, nobody cares about the panther for a reason). But here? Here we HAVE to jump if we want to keep moving. But ah, not so fast bold player! For you have in front of you the dreaded Fishman, a creature that jumps in front of you from the depths and shots fireballs if you don't end its life fast enough. But here's the key word: in front of you. Fishmen will never spawn close enough for you to get hit by them, and you can react with enough spare time here.
We are also presented here with a new subweapon: the stopwatch. This one acts more like an extra help for the player that might feel overwhelmed by the enemies, as it allows them to freeze them in place for a few seconds. Not the best since it doesn't really work against bosses with some exceptions, but helpful nonetheless.
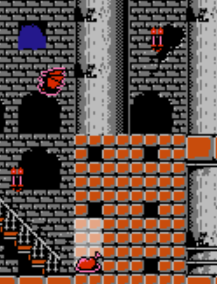
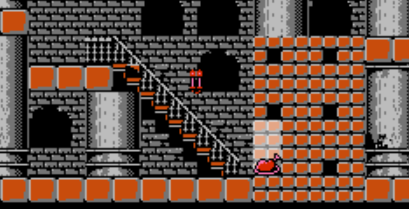
Now, we have two hidden things in this stage, and the one I know was intentional for a fact it's actually taught worse than the one that was probably a happy accident. Let me show you:

In this ledge right here, there's no invisible boundary, so the player can jump over it and continue towards the door to the right. But the ledge's too far for the player to reach it, and too high as well. Addressing the intentional feature, you could say that the placement of the tiles here might strike (pun intended) odd for the player, but that really doesn't showcase that it can be destroyed. Again, future titles do this better by putting either a candle next to the wall or an enemy, but considering these are really valuable items to acquire (health is the most important thing in a Castlevania game after all) I won't really bash it that much. But now, to the happy accident.

If you stay on the left side of the platform above the hole in the wall, you will find out that the bat spawning boundary will make it so as the bat will spawn from the left side of the screen if Simon sprite is looking into that direction. And then, if you use the knockback of the bat into account and touch it while its flying where the candle over the staircase is located, the knockback will send you to the upper area of the ledge, making you skip the Fishmen area completely.
Speedrunning techniques are sometimes not taken into account while making a game (and let's be honest, I love this game to death but I doubt this was planned), but a good level design allows them to be pulled off even if it wasn't part of the main path. That's the beauty of making games after all: doing something only for people to find different approaches to it. Anyway, almost at the end of Level 1!
Level 1-3

Level 1, Castlevania, Castlevania Crypt
Final stretch towards the first boss of the game: the Giant Bat! Here we are introduced to one of the most useful subweapons: the axe. Its arch is best tested against the boss of the first level, as its air movement makes it hitting it with the whip quite cumbersome. Also the Gold Potion, which is so forgettable that I completely forgot about it.
The Giant Bat it's probably the easiest boss in the entire franchise, and one of the most iconic ones for sure. Sure, it doesn't have fancy moves or really dangerous moves other than fly towards the player and perhaps throw a fireball if you linger for a long, long time without dealing damage to it, but a nice boss nonetheless. Also quite the smart use of a fake door in order to make the player think it leads to another stage.
And with that, you slay the Giant Bat and obtain the Red Orb, which heals the player to full HP and exchanges your hearts and time left into the score counter.
And that was the very first level of Castlevania. Overall, a very solid introduction to the mechanics and gameplay for the player, and a good example of what happens when you spend time and effort into creating well crafted areas and enemies.
Tune in next time for Level 2!
Have a great week,
-Ray
